Linux WSL2 printing server on Windows 10
Printing on Windows is sometimes troublesome. When it is not working, you won’t have any chance to fix it yourself, debug or configure it more in-depth. This guide will show you a workaround on how to use the Linux CUPS printing client and server on Windows 10 using WSL2. The CUPS printer will be then added as a native Windows printer.
WSL2 is a subsystem on Windows to run Linux systems in an integrated container, like Docker. We’re going to install a NixOS version using Windows Powershell.
Installing WSL2 NixOS and CUPS
Open Powershell as administrator and insert following command, where the download link is the latest release of NixOS for WSL.
wsl --update
wget "https://github.com/nix-community/NixOS-WSL/releases/download/2311.5.3/nixos-wsl.tar.gz"
wsl --import NixOS .\NixOS\ nixos-wsl.tar.gz --version 2
wsl -d NixOS
Edit the system configuration file and append following lines to configure the printing server and adding a remote IPP printer:
services.printing = {
  enable = true;
  openFirewall = true;
  defaultShared = true;
  browsing = true;
  allowFrom = [ "all" ];
  listenAddresses = [ "0.0.0.0:631" ];
};

hardware.printers = {
  ensurePrinters = [{
    name = "Dell_1250c";
    location = "Home";
    deviceUri = "http://192.168.178.2:631/printers/Dell_1250c";
    model = "drv:///sample.drv/generic.ppd";
    ppdOptions.PageSize = "A4";
  }];
  ensureDefaultPrinter = "Dell_1250c";
};
We define Dell_1250c as the printer name and the IPP url (which could also be a remote address) to the printer.
The next part will enable local printer sharing via SMB. This is only required if Windows is still not accepting the CUPS IPP printer (see “Adding printer on Windows” section).
services.samba = {
  enable = true;
  package = pkgs.sambaFull;
  openFirewall = true;
  extraConfig = ''
    load printers = yes
    printing = cups
    printcap name = cups
  '';
  shares = {
    printers = {
      comment = "All Printers";
      path = "/var/spool/samba";
      public = "yes";
      browsable = "yes";
      "guest ok" = "yes";
      writeable = "no";
      printable = "yes";
      "create mode" = 0700;
    };
  };
};
systemd.tmpfiles.rules = [
  "d /var/spool/samba 1777 root root -"
];

services.samba-wsdd = {
  enable = true;
  openFirewall = true;
};

services.avahi = {
  enable = true;
  publish.enable = true;
  publish.userServices = true;
  nssmdns4 = true;
  openFirewall = true;
};

systemd.timers.rpcclient = {
  wantedBy = [ "timers.target" ];
  after = [ "samba-smbd.service" ];
  timerConfig = {
    OnBootSec = "0m";
    OnUnitActiveSec = "5m";
    Unit = "rpcclient.service";
  };
};

systemd.services.rpcclient = {
  script = ''
    set -eu
    ${pkgs.samba}/bin/rpcclient -U "" -N -c enumprinters localhost
  '';
  serviceConfig = {
    Type = "oneshot";
    User = "root";
  };
};
Where the last part with the systemd service and timer will trigger a rpcclient call after boot which pre-fetches the CUPS printers. This will ensure that the printer is already present before the Windows host will ask for it.
Now we open the Windows task scheduler and create a new startup task for Windows to run WSL2 NixOS every time the computer starts. A more detailed guide on this can be found here but in short it is
- Left pane click on
Task Scheduler Library - On the right side right click on free space and choose
Create Task - General: Give the task the name
WSL Startup - General: Choose
Run whether user is logged on or notandRun with highest privileges - General: Choose
Configure for: Windows 10 - In Trigger tab click on
New > Begin the task: At startup - In Action tab click on
New > Action: Start a program- Program/script:
%USERPROFILE%\run_wsl2_at_startup.vbs
- Program/script:
- In Conditions tab disable all AC power related options
Open PowerShell and create the startup script file
echo "" > $HOME\run_wsl2_at_startup.vbs
notepad $HOME\run_wsl2_at_startup.vbs
set object = createobject("wscript.shell")
object.run "wsl.exe --distribution NixOS", 0
Adding printer in Windows
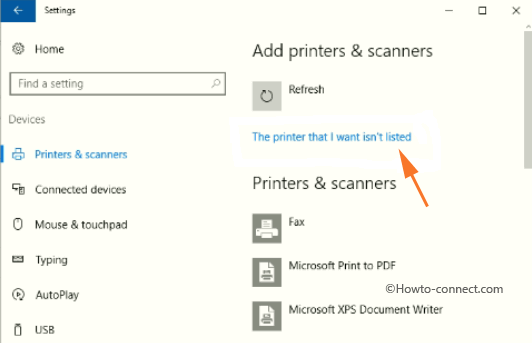
To add the new printer go to the system settings and navigate to Devices > Printers & scanners. Click on Add new and wait until the link “The printer that i want isn’t listed” appears. Click on this link.
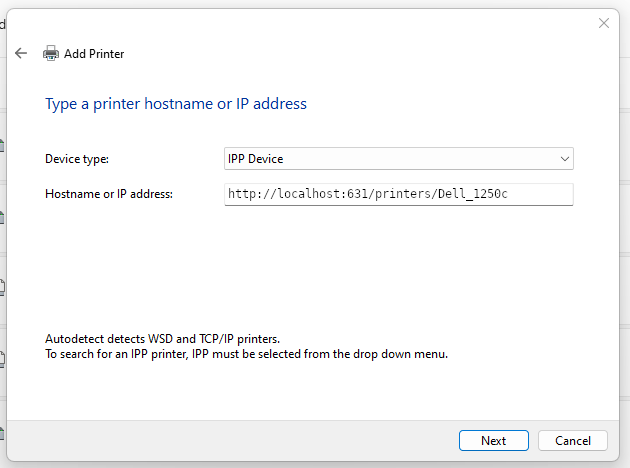
In the new window click on Add a printer using an IP address or hostname. Add the URL of your local CUPS server with the name of your printer, in this example http://localhost:631/printers/dell_1250c.
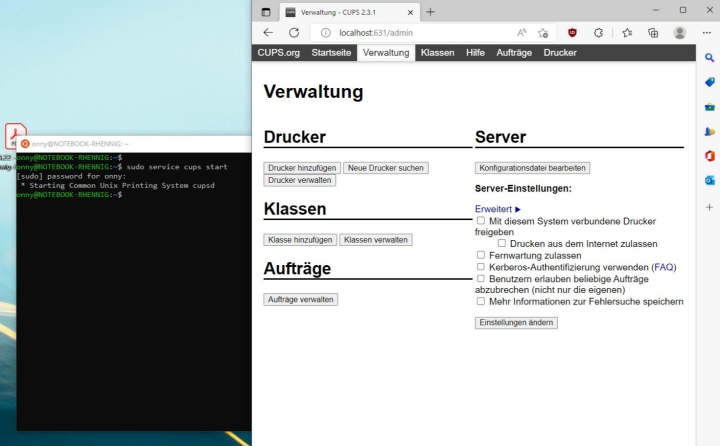
Print a test page and your local CUPS server should send the print job to the next destination. In case there’s any issue you can see queued and finished print jobs in the CUPS interface at http://localhost:631.
If Windows 10 won’t accept any IPP url the optional Samba share configured above can be used to access the printer on Windows. In this case try to add the device with the URI \\nixos.local\Dell_1250c where “nixos” is the hostname of your WSL NixOS guest system. Sometimes you’ll have to access \\nixos.local\printers first and authenticate with username nixos and your specified password.