Voice control Archlinux with Amazon Alexa

I was interested to see how commercial voice recognition software would behave on an usual Linux laptop and tried to deploy an Amazon Alexa instance. There are some installation scripts and tutorials available for Ubuntu and Raspberry PI using the avs-device-sdk from Github. Even though some of them are official instructions, they still looked messy and complicated, so I created some AUR packages to simplify the process.
Install the Alexa app
Instead of running a custom bash installation script for the Alexa app, you can now use the AUR package:
aur sync -c avs-alexa-sampleapp
pacman -S avs-alexa-sampleapp
Of course you have to create an Amazon Developer Account and “register” your new Alexa instance. Just follow this tutorial and download the config.json file. Put this file into: /var/lib/avs-alexa-sampleapp/ and run:
chown alexa:alexa /var/lib/avs-alexa-sampleapp/config.json
sudo -u alexa /usr/share/avs-device-sdk/genConfig /var/lib/avs-alexa-sampleapp/config.json 123456 /var/lib/avs-alexa-sampleapp /var/lib/avs-alexa-sampleapp /var/lib/avs-alexa-sampleapp/AlexaClientSDKConfig.json
Now your Alexa instance is ready to go with the final configuration file at /var/lib/avs-alexa-sampleapp/AlexaClientSDKConfig.json. Most parameters for the genConfig command above are adjusted to the installed package files and you don’t have to change them. Only the string ‘123456’ refers to the device serial number but you can leave it with that.
Before starting Alexa, I recommend to allow Pulseaudio access for the alexa user. In this case Alexa will behave like a normal audio software on your machine and for example audio output will be routed to your bluetooth speakers etc. Create a user specific Pulseaudio configuration, append a authorization rule and a separate Pulseaudio rule for the alexa user:
[...]
load-module module-native-protocol-tcp auth-ip-acl=127.0.0.1
default-server = 127.0.0.1pulseaudio -k
pulseaudio -DStart the Alexa service with following command and ask some questions ;)
systemctl start avs-alexa-sampleappControl Archlinux using Alexa
We need two separate programs running on our local machine. One python script which will handle the voice commands and will trigger the system commands and a second program called “ngrok” which will tunnel the api port of the python script to a public endpoint.
aur sync -c python-flask-ask ngrok
pacman -S python-flask-ask ngrok
import logging
from flask import Flask
from flask_ask import Ask, statement, question, session
import subprocess
app = Flask(__name__)
app.config['ASK_VERIFY_REQUESTS'] = False
ask = Ask(app, "/")
logging.getLogger("flask_ask").setLevel(logging.DEBUG)
@ask.intent("Suspend")
def suspend():
subprocess.Popen(["systemctl", "suspend"])
return statement("Suspending computer")
@ask.intent("Firefox")
def suspend():
subprocess.Popen("firefox")
return statement("Launching Firefox")
@ask.intent("Screenlock")
def suspend():
subprocess.Popen("swaylock")
return statement("Locking screen")
if __name__ == '__main__':
app.run(debug=True)Start the python script and ngrok in parallel with these commands:
python tuxtux.py
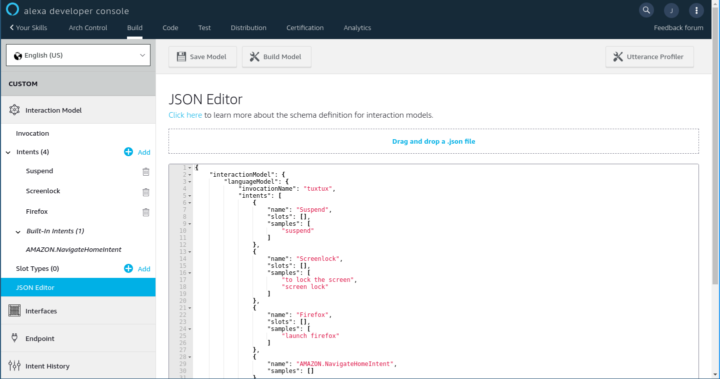
ngrok http 5000Go to https://developer.amazon.com/alexa/console/ask, login with the same account as used in the SampleApp configuration and click on “Create skill”. Define the skill name, e.g. “Arch control”, select “Custom” and “Self hosted”. Click on “Create skill” and select “Start from scratch” on the next page. The next page shows the skill builder editor. In the left menu, click on JSON-Editor and paste following code:
{
"interactionModel": {
"languageModel": {
"invocationName": "tuxtux",
"intents": [
{
"name": "Suspend",
"slots": [],
"samples": [
"suspend"
]
},
{
"name": "Screenlock",
"slots": [],
"samples": [
"lock the screen",
"screenlock",
"screen lock"
]
},
{
"name": "Firefox",
"slots": [],
"samples": [
"launch firefox"
]
},
{
"name": "AMAZON.NavigateHomeIntent",
"samples": []
}
],
"types": []
}
}
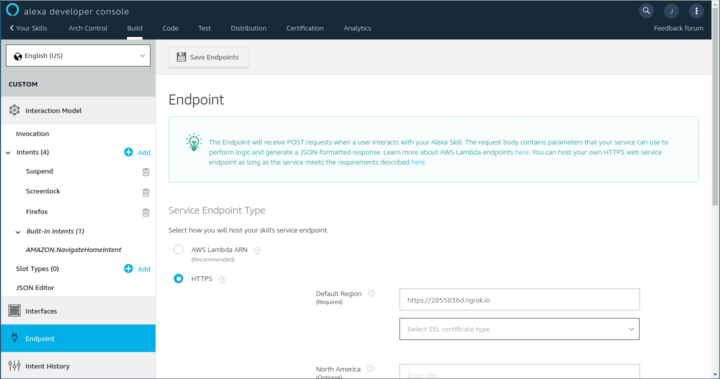
}After clicking on “Save model” and “Build model”, go to “Endpoint” in the left menu and set “Service Endpoint Type” to “HTTPS”. Enter the ngrok HTTPS-Url (which looks like https://2855836d.ngrok.io) in the “Default Region” field and click on “Save Endpoints”.
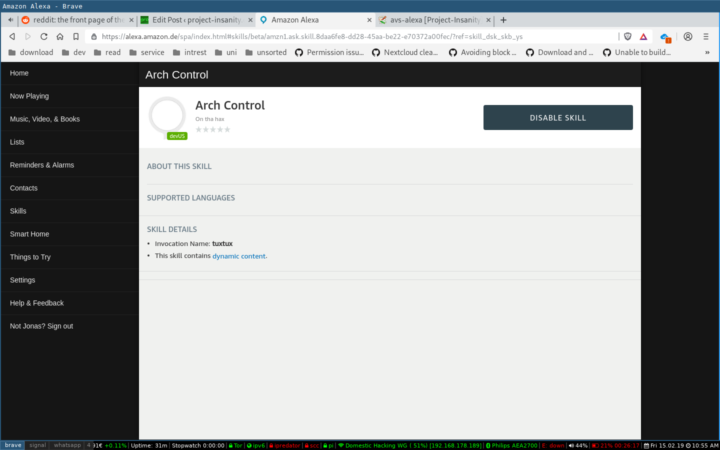
Now enable the new “developer skill” on https://amazon.alexa.com. After logging in with the same Amazon account as used by the SampleApp deployment, select “Skills” in the menu, “Your skills” in the upper right corner and below in the menu “All skills”. Click on the name of your created skill and click “Enable”.
Now try the custom voice commands with commands like:
- „Alexa, tell Tuxtux to suspend“
- „Alexa, tell Tuxtux to launch firefox“
- „Alexa, tell Tuxtux to lock the screen“
Alexa, please open xhamster
This is pretty good actualy
hi
can you make documentation for creating an open source AI assistant for arch linux , which can run on every desktop environment like gnome,kde,hyprland,cinamon,xfce etc..