Hardware fix for Dell “AC power adapter could not be determined”

My old but good Dell Latitude E6410 notebook stopped charging and working with the original Dell AC power adapter some months ago. It was working only sporadic but in most of the cases the blue led of the AC power adapter went off after plugging it in. I tried an other Dell power adapter but with the same results so I thought it was a hardware fault on the notebook side.
Nevertheless Krischan had an idea and tried an 20V power adapter from an other manufacturer. Turns out this one worked powering the notebook but charging was still disabled. An error message popped up in the BIOS “AC Power adapter could not be determined“.
We did some research and found an interesting article mentioning an additional data pin (inner pin of plug) of the power adapter which is used by the notebook to “communicate” and validate the power adapter via 1-wire-protocol.
So the next idea was quite unusual but a step into the right direction. We used the power wires (PWR/GND) from the non-Dell power adapter and wired the data pin + GND of the plug to the original Dell power adapter.
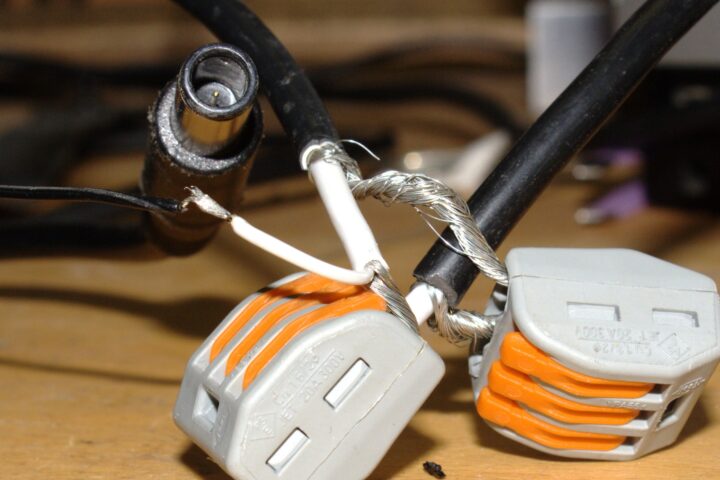
AC plug on the left connected to DATA and GND
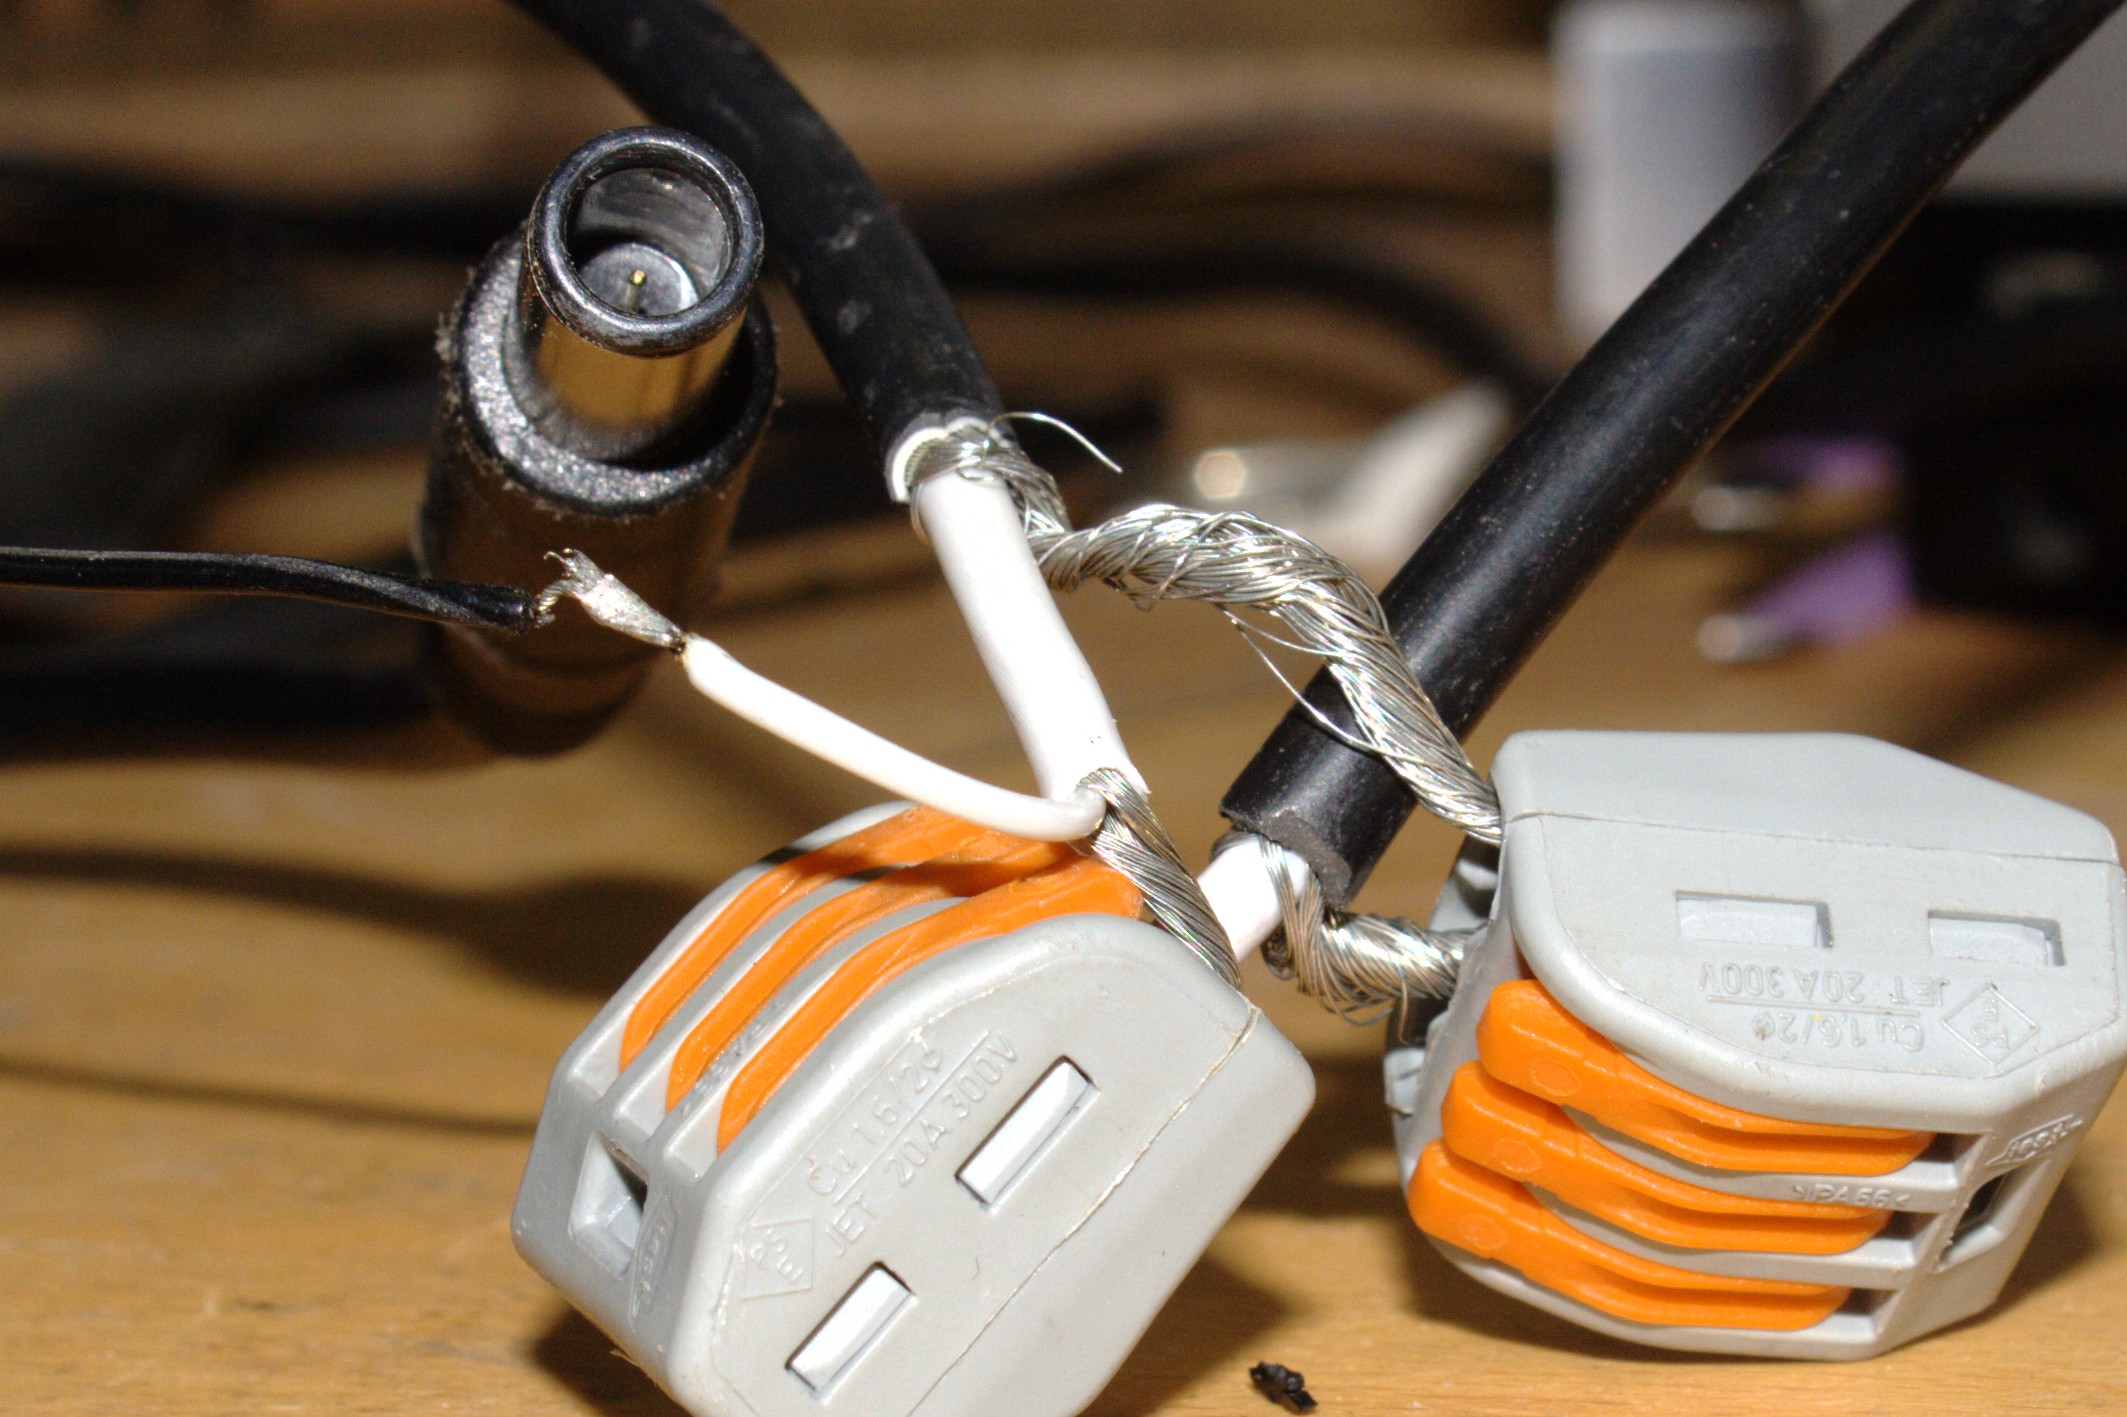
We tricked the notebook into “thinking” it was still connected to the faulty 19V power adapter via the data wire and used the ac power from a secondary working power supply.
**WARNING**: Depending on the One-Wire-IC or the programmed value the notebook is detecting everytime the same value like “90W AC-power-adapter” independent which adapter is plugged. If you proceed with following hack and then take a weaker 65W-AC-power-adapter, it could or will overheat by overload!!! (maybe deactivating Express-Charge in BIOS could be a dirty workaround [untested!]) You should know what you do. Alternative and better way is to reprogram with tools like OneWireHub or DS2502_DELL_PS the One-Wire-chip from other AC-adapter you want to use for response to Dell notebooks. Background-info like in this comment: https://news.ycombinator.com/item?id=23304973 Another hack uses an ATtiny 13 to emulate a OneWire DS2501 IC
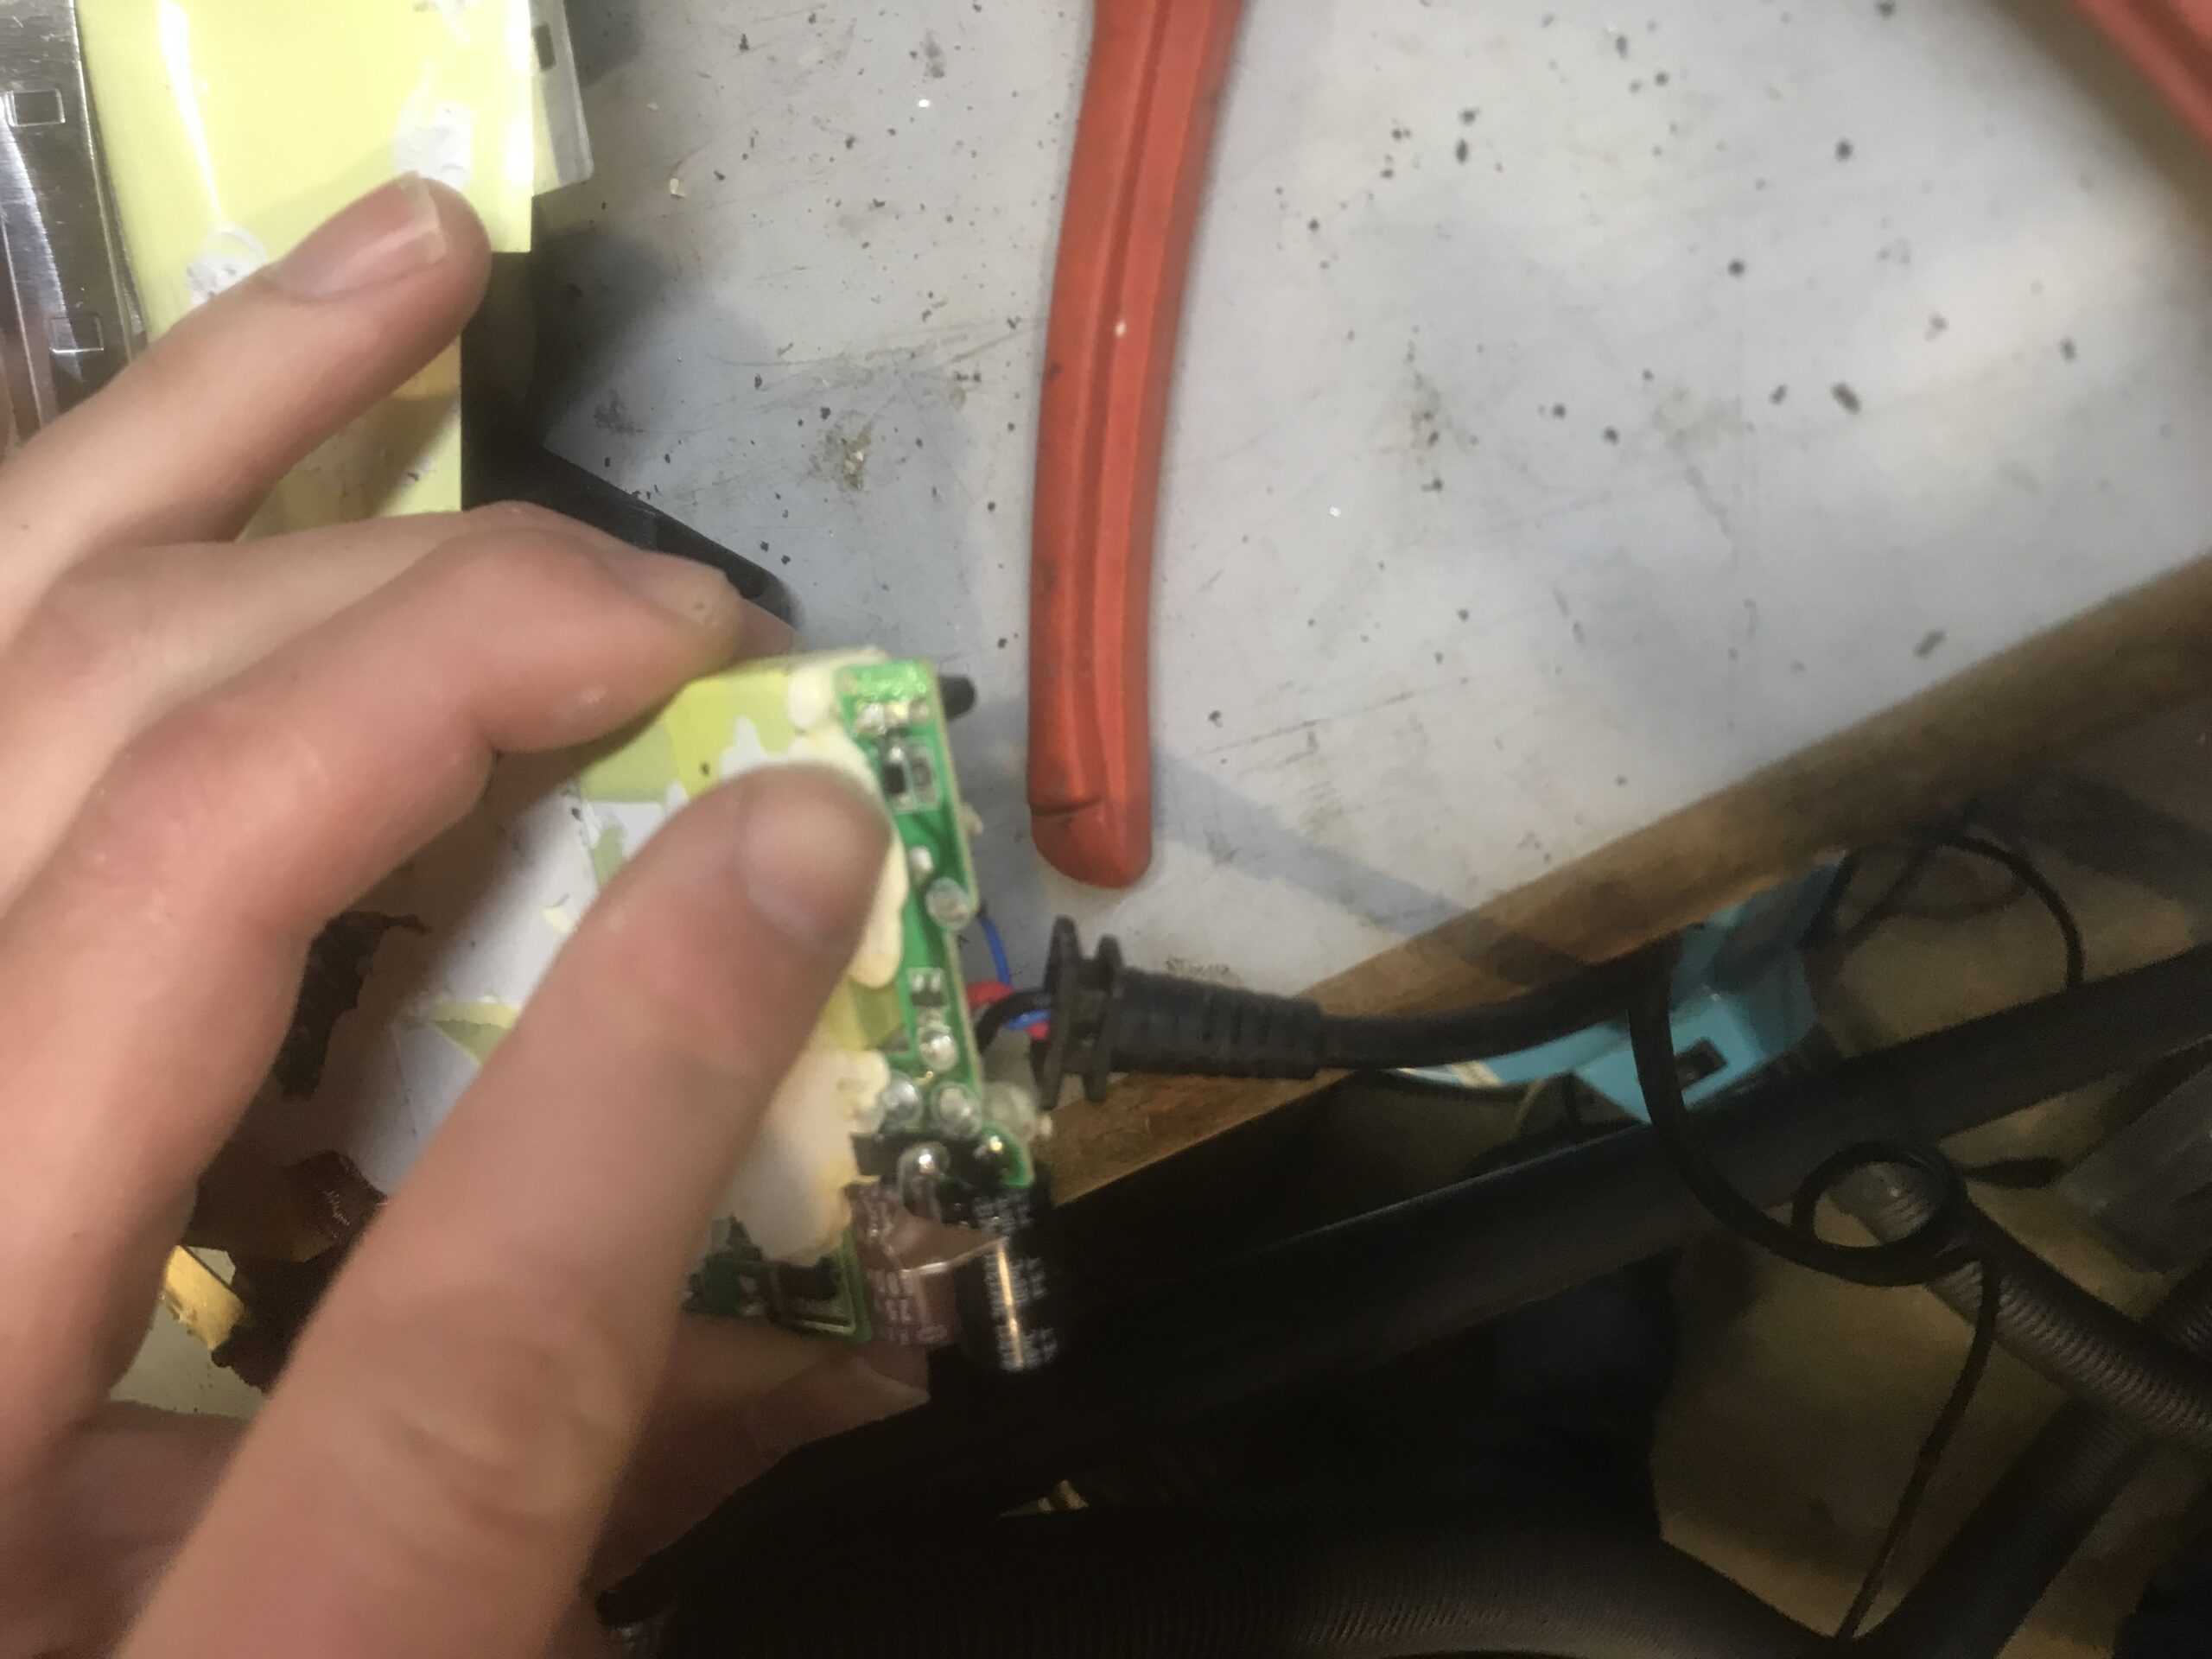
In the next step, we cracked the case of the Dell power adapter and desoldered the transistor style chip mentioned in the article above. It is connected to the data wire and marked with “DALLAS – 250X” (MAXIM chip) or “28W2M1I – BYE”.

Cracking the power adapter case 
Three wires, blue is the data wire 
The DALLAS chip in question near the blue wire


The next idea was to put this chip directly into the notebook. We traced the data pin from the jack back to the connector on the motherboad. We cut the data line and soldered the “28W2M1I” one wire chip together with a resistor and diode to the board connector. The diode and the 120-130Ω resistor are probably optional and belong to the protection circuit.

Power connector on the motherboard with DALLAS chip 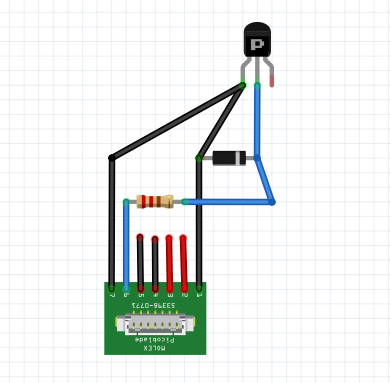
Simplified circuit diagram
Surprisingly this hack is really working! We can now use any power adapter and the notebook is running and charging well. The BIOS still receives the correct information from the 1-wire chip, which is now soldered into the notebook.
Update 2020/05: This post got featured on Hackaday.com (archive), thank you for all this feedback :)
“Nethertheless”
That’s a new word…
That’s cool…. But why not just buy a $5-10 replacement charging port? They’re modular for a reason.
@ StudaBaker Since I had already two potentially broken ones I thought it was a fault on the notebook. But usually I always going to check other power adapters first.
On the other hand if I would buy a new DELL power adapter, how can I be sure it will last longer than the others? It’s always good to be able to use old ones too, just to recycle them ;)
Hi, Im having the same problem, but dont have much experience with electronics. I wondered if you could confirm that there should never be any voltage on that center Data pin when not connected to the laptop? I have a system that wont charge, and the AC adapter is not recognised in the Bios. It runs the laptop if the battery is unplugged, Battery is now flat. I bought another identical charger, second hand, and that doesnt charge either. The voltages are, 13 volts on my original charger center pi, and 6.5 volts on my second charger. Are they both suffering from Dallas chip failure? Thanks, Steve
Stephen, in answer to your question, on my Dell Inspiron laptop, with the 19.5V power supply connected, and the DS2501 disconnected from the power supply, there is 3.2VDC measured at the center pin of the laptop. That’s because there in a 2.2KOhm pull-up resistor to 3.3V on the center pin INTERNAL to the laptop. When the DS2501 is re-connected to the power supply, the center pin has a digital pulse train on it.
I’m using a precision 5530 with the Nvidia GPU and 130W charger.
I bought a used 130W “slim” charger & tore it apart. It’s been updated with SMD components (no clear DS2501).
I can confirm that the technique still works:
Supply new 19.5VDC source and attach it to the laptop’s charger cable (Positive=White, Negative is Black)
Connect the “Donor” charger as well (Data=Blue, Negative is Black)
Cut the “donor” charger’s Positive (White) wire and tie all three Negative (Black) wires together. The laptop will charge and run showing “plugged in” to a 130W charger.
Since the SMD ID chip is difficult to isolate, you can instead cut the board into two pieces with a Dremel cut-off wheel.
The entire output section is isolated with a transformer & 2 @ opto-isolators. The board can be severed right down the middle of the opto-isolators & transformer – cut the leads off both sides of the transformer and remove it (glued only). The remaining portion of the output section will be about 2-1/2″x2″. You can then desolder/cut/remove EVERY non-SMD component + metal guard/heat sink on the top side of the PCB output section (ONLY the SMD are required for the ID chip to operate properly). You can then insulate and or encapsulate the new FLAT PCB and install it near your new 19.5VDC power source.
I have tested it with my e6410, but I haven’t soldered the resistor nor the diode. And it works!!!!.
I have this laptop which is a bit old but still a good laptop. My AC adapter stopped working, so I connected a spare AC adapter I had, a non Dell one. Works when AC is connected but no battery charging. So I start searching info on that “AC works but no battery charging” and after several pages about Dell nonsense fn-F2 to enable/disable battery charging I ended up in this blog, So I said “why not?”, and decided to give it a try.
I opened the case of the original AC adapter and located the transistor shape circuit connected to the data wire. I desoldered it and connected it to the power connector of the mainboard.
Pins 1 and 7 from the power connector to pin 1 of the “transistor” and pin 2 of the connector to central pin of the “transistor”. Just as your diagram, but without the resistor and diode.
And it works like a charm. I have now a non Dell 100W AC adapter connected and when you check in the BIOS it gets recognized as 90W Adapter. And battery is charging.
“Why don’t you just buy a new Dell AC adapter?” Because I had this spare adapter (two of them, in fact), the laptop is out of any warranty from Dell, and I hate when companies force users to buy their replacements making alternatives not to work.
And, most of all, because it was funnier.
Thank you very much for sharing your work!
Hey All, I bought an Alien-ware 15R2 a few years back, really liked it, but the whole “Not a recognized power supply” thing started 6 weeks after warranty expired, as normal as at least 50% or more of Dell laptops do this, and I am sure on purpose. This is one reason I stopped buying Dell laptops at work.
So I bought a new dell charger to replace the alienware one, and i got the same problem, I called Dell and they said i have to replace the whole motherboard for $980 Cnd. So then i tried to replace the power jack, as I read that could be it too…. I bought a replacement power jack, installed it and i have the same problem. What can it be? Will the above mentioned hack fix the issue?
Is there any troubleshooting technique I cna do to verify what the issue is?
This alienware has been sitting in my garage for a couple years now, thought i t would try to hack it somehow, as it it dies its no big deal. At least i got a year out of a $2000 laptop… haha
I tried to convert an old Dell lpatop charger to USB-C.
When it didn’t work I found this page . Ripped the chip out of an old dell charger. Added that into my USB-C modification and it worked. Thanks!
A cheaper solution if you don’t have a battery:
Redirect the battery pins to the power plug. The system will detect you have a “non dell battery”, but it will work if the power is enough and the voltage limit is not exceeded. I have a 15R SE and it works with any 90W+ power, including its 19.5V original PSU.
Does anyone know what type of diode this could be? Thanks in advance
this could be a suppressor- / TVS- diode for over-voltage protection (like max <6,3V)
Hi Neutrino, thank you for the detailed writeup. I have zero experience with electrical engineering or soldering of any kind, but I am not averse to a little elbow grease and research. Should I do it? Like, what are the odds of permanently damaging my laptop? And what kind of equipment do I need?